Voice Control Home Lighting

How To Control Your Home Lighting By Voice?

Controlling your home lighting by voice is a convenient and efficient way to manage the ambiance of your living space. By integrating smart home devices such as voice-controlled assistants or intelligent light bulbs, and LED Controllers, you can easily adjust the brightness, color, and scheduling of your lights with simple voice commands. This hands-free approach adds a touch of modernity to your home and enhances your living environment’s overall convenience and comfort. So, say goodbye to traditional light switches and embrace the future of home lighting control with voice commands. Today, let’s check how to control your home lighting via voice.

  1. The first thing you must ensure is that you have voice control input devices; the most popular ones integrated with Google Assistant or Amazon Alexa.
Voice Control Input Devices

2. The second thing you must ensure is that the Smart LED Lights can connect to the voice control devices. Except the LED Lights with WiFi communication modules, otherwise you will need to the Gateways, 2.4G Gateways or Zigbee 3.0 Gateways.

3. The third thing is to add them to the various groups on your phone APP to control them separately or in groups.

Today, we will teach you how to do step-by-step operations to control the LED Strips by voice commands.

For the LED Strips, 3 main types of controllers are available that integrate 2.4G, Zigbee 3.0, or WiFi.

For the 2.4G LED Controllers, you will need the items below:

  1. LED Strips
  2. 2.4G RF LED Controller
  3. Power Supply
  4. 2.4G Gateway
  5. RF Remote Control(Not necessary)
  6. Wires

For the Zigbee 3.0 Controller, you will need the ones below:

  1. Strip Lights
  2. Zigbee 3.0 Controller
  3. LED Driver
  4. Zigbee Gateway
  5. Zigbee Remote Control(Not necessary)
  6. Wires
  7. Connectors

For the WiFi Controller, you will need the items below:

  1. LED Tapes
  2. WiFi LED Controller
  3. LED Power Supply
  4. Remote Control(Not necessary)
  5. Wires
  6. Connectors

There are various types of Strip Lights available; you can consider single-color, tunable white, RGB, RGBW, RGB+CCT, Addressable single color, addressable CCT, RGBIC, addressable RGBW, and addressable RGB+CCT. You can use them for various scenes. The IP20 or IP30 non-waterproof strip lights for indoor use only, and you can consider the IP65, IP67, and IP68 ones for outdoor locations.

How to install them in your space?

  1. Hide the Flexible LED Strips: you can use the IP30 non-waterproof and IP65 surface-coated waterproof LED Strips for indoor applications. The back with double-sided adhesive tape. It’s easy to remove the protector paper and stick it where you want to install them. I recommend adding aluminum LED channels to hold strip lights to achieve a clean and professional look while protecting the strips. The LED Profiles also can work as heat sinkers for better heat dissipation.
  2. Connect to the controller: choose the correct LED Controller for the LED Strips. If the controller can not be paired to the network directly, please add Gateway.
  3. Connect the controller to the LED Power Supply. Various output voltage LED Drivers are available. Before you purchase them, please ensure the output voltage is the same as the working voltage of LED Light Strips. For some short applications, you can also consider using a battery pack or power bank to light up.
  4. After the system is powered on, please test if all parts work well.
  5. Test if you can use voice commands to control the LED Lights.

By these following steps, you can easily control your home lighting using voice commands, adding convenience and flexibility to your living space.

30A WiFi LED Controllers

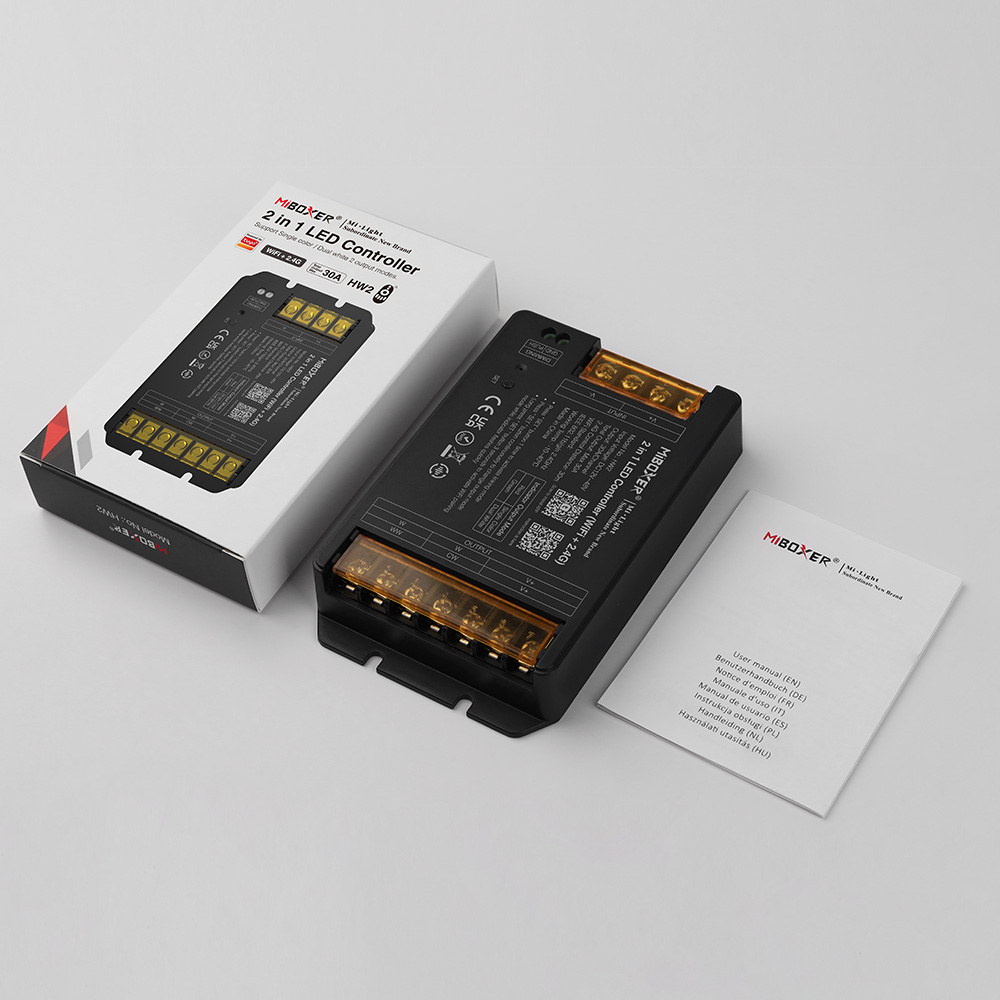
The New 30A Large Output Current Controllers Arrived

The newest MiBoxer 30A Light Controllers are available on Ledbe now. Those with a max 30A output current design can load more LED Lights than similar products.

30A WiFi LED Controllers

There are 2.4G series and 2.4G+WiFi series Controllers available. The 2.4G series includes HR2(2 in 1) and HR5(5 in 1). The 2.4G + WiFi series includes HW2(2 in 1) and HW5(5 in 1). The 2 in 1 Controllers are designed for dual-white and single-color LED Lights; 5 in 1 can be used for all types: single-color, dual-white, RGB, RGBW, and RGB+CCT.

All of them can work with MiBoxer RF Remote Controls; you can use the remote control to select the color and adjust the brightness, color temperature, and saturation for various scenes. Also can work with Tuya APP and third-party voice commands. You can control the Lighting from your phone or use the voice commands. The WiFi series can pair to your WiFi network directly, and the 2.4G series needs to add a 2.4G Gateway.

LED Controller Voice Control

Those Controllers with auto-transmitting & synchronization functions. One Controller or Dimmer receives the signal from a 2.4G RF Remote and will transmit to the same model LED Device within 30 meters; all will synchronize. This will be very helpful if you want all LED Lights to change simultaneously.

Tuya LED Controller

If you want to order some for your projects, please check the link below:

2 In 1 series: 30A 12V Dimmers For Single-color/Dual White

5 In 1 series: 30A Tuya RF Lighting Controllers

SP801E? Real Worth It?

The SP801E, which is the newest Pixel Controller by Shenzhen Sperll company, this company released the classic Controllers for the Addressable LED Strips like SP105E,  SP110E, SP108E, SP501E, etc. if you check the photo of the SP801E below, you will think, it looks the same like the SP105E, so if we own one the old product, why we need to another similar one, Is it’s really worth it?

SP801E Pixel Controller

The SP801E LED Controller with 4 output ports, each port supports 1024PCS ICs, so the totally supported number of ICs up to 4096PCS, not only supports the main types of ICs on the market but also supports multiple Art-Net software, supports regular rectangle layout setting and importing DXF files. built-in multiple types of effect layers, text layer, music effect layer, etc. the effect layers support a variety of custom parameters: direction, width, color, length, shape, etc. with the real-time preview function, you will know how it looks like before run on the LED Lights. so it can work with LED Strips, LED Matrix, LED Panels, etc.

SP801E Smart LED Controller

The Smart Pixel Controller supports AP mode and STA mode.

SP801E Smart Controller

the working voltage from DC5V to DC24V, the working voltage depends on the LED Lights. you can control the LED Controller by smartphone APP via WiFi, it supports IOS and Android mobile systems, you can download the APP “BalanX” in the APP stores. the Controller supports AP mode and STA mode.

SP801E

Button:
1. Click on the button: Switch AP/STA mode;
2. Press and hold the button: Enter the BluFi network configuration mode; LED Indicator:
1. Blue static: AP(Access Point) mode;
2. Green static: STA(Station) mode;
3. Green flashing: BluFi configuration mode;
Working Modes:
1. AP(Access Point) mode: Controller and Phone connect directly, controller works as an access point.
    1> Go to your phone Settings page, connect the controller(SSID like SP801E_XXX, the default password is 12345678);
    2> Open the BanlanX App, Click the “+” button to configure the new SP801E controller, then the controller will be shown on the device list; 2. STA(Station) mode: Controller and phone are in one same Wi-Fi network, in this network, users can operate the controller.
There are two ways to configure the controller into the local Wi-Fi network:
1> Connect your phone or tablet to a 2.4G Wi-Fi network. (Doesn’t support 5.0G Wi-Fi network)
2> Open the App and click the “+” button to scan devices, click Add manually and select SP801E controller in the device category;
3> Input your Wi-Fi network password;
4> BluFi config and AP config:
   BluFi config: Press and hold the device’s “STA/AP” button until the green led indicator flashes, then the device enters the network configuration state, click next and select the device you want to add;
   AP config: Switching the device to the AP mode, click next and connect your phone’s WIFI to the named like SP801E_XXX hotspot, the password is 12345678, and return to the APP;
5> Pressing next step to wait for the configure processing to finish;
6>After the configuration is finished, the LED indicator will turn into solid green, the controller will be shown on the device list.