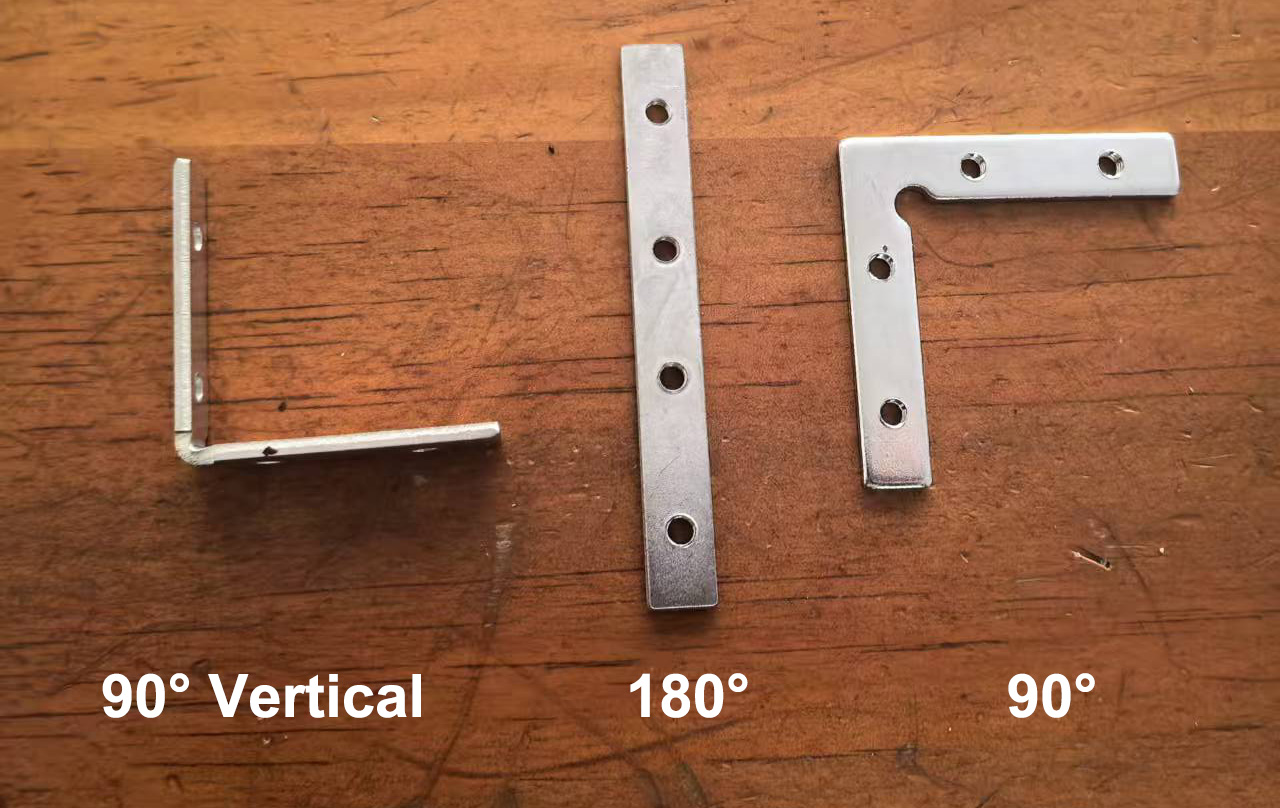
How To Hide LED Strips

How To Hide LED Strips On Ceilings/Walls?

If you do not have experience in interior decoration, adding LED strips to your ceiling or wall will be a big challenge. But it will be very easy if you know how to do it. So today, let us teach you how to do it.

Hide LED Strips On Ceilings Or Walls

What are the benefits of mounting strip lights on ceilings/walls?

  1. Protect the LED lights: The common way to mount flexible LED strips on ceilings is to use double-sided adhesive tape or silicone clips. However, the exposed strip lights will be affected by the surrounding conditions, such as accidental bumps, spills, rain, etc., which may shorten the lifespan of the LEDs. So, if we could put them in something and keep them safe, it would extend the lifespan.
  2. Consistent With Your Designs: Adding a light strip alone will look out of tune with the overall design, especially when the surface of the light strip has components of different colors and the light dots on the SMD light strip. So, hiding the light strip with a slot that matches your interior will make the overall design more beautiful.
  3. Aesthetics: For a sophisticated look, hide strip lights on ceilings, walls, under cabinets, along baseboards, under shelves, etc. You can transform the space elegantly while keeping the interior design clear and gorgeous.
  4. Anti-glare: High-density LED strip lights cause glare, making people’s eyes uncomfortable and even causing headaches. This can be fixed simply by adding a diffused cover to the LED strips.
Hide LED strips in the shopping cabinets

The Ways To Hide Them:

Using the aluminum LED channels will make hiding the LED strips on ceilings or walls easy. There are four ways to install the LED channels on the ceilings or walls:

  1. Suspended: The suspended installation method allows you to mount the LED strips on the ceilings to create a sleek and modern look, enhancing the overall design of your space. It also can add visual interest and depth to ceilings. There are lighting slots in the aluminum LED channels; you can stick the LED strips inside and clip in the diffusers to diffuse the light evenly, reducing harsh shadows and hotspots. This installation method can be in various configurations, such as straight lines, squares, or geometric patterns, allowing creative and customized lighting solutions.
pendant LED Diffuser Tube
  1. Surface Mounted: This installation method is typically easy to install, often requiring only adhesive or screws. This makes them suitable for both DIY projects and professional installations. You can choose the various shapes and sizes of LED light channels, and they can be customized to fit different design aesthetics and applications for residential and business places. The flexible LED strips can be easily stick inside; the diffusers will diffuse the lighting smoothly without dark areas. They can provide direct lighting for task lighting. The aluminum channels will protect the strip lights from dust, moisture, and physical damage to extend their lifespan. The mounting clips are include, you can mount them on surface on walls or ceilings.
How To Hide LED Strip Lights
  1. Recessed: The recessed installation methods allow them to integrate with the surroundings seamlessly. By being flush with the ceiling or wall, they will create a clean, unobtrusive look, enhancing the overall design of your space without visible fixtures. Those light channels will provide uniform lighting, reducing harsh shadows and ensuring a balanced ambiance. The recessed designs will minimize direct glare, making them suitable for areas where comfort and visibility are important, especially in the residential spaces.
Aluminum LED Channels For Strip Lights
  1. Mud-in: The mud-in installation is another recessed method, particularly popular in architectural designs. It is designed to be embedded into the wall or ceiling, providing a flush, clean appearance that blends seamlessly with the surrounding surfaces, making it ideal for minimalist and contemporary interiors. The mud-in LED channels can be used for various purposes, including indirect lighting, accent lighting, and general illumination, allowing creative design possibilities.
Recessed Mud-In Aluminum LED Channels

How to hide LED strips using aluminum channels:

  1. Choose the correct LED channels: Confirm the installation method for your LED strips and choose the right channels.
  2. Measure and cut: Measure the area where you plan to install LED strips and cut the channel to the desired length using a saw or cutter.
  3. Install LED channels: mount the aluminum LED channels on ceilings or walls.
  4. Peel off the backing from the LED strips and stick them inside the channel, ensuring they’re properly aligned.
  5. Clip-in the diffusers: snap or slide the diffused cover onto the channel to diffuse the light and hide the strip lights.
  6. Connect to the power supply: connect the LED strips to the power supply and check if the lighting is working.
  7. Check if everything is working correctly.
  8. Installation completely.

Conclusion:

The easiest and fastest method for hiding LED strips on walls or ceilings is to use aluminum LED channels. They look sleek and modern and provide even light output and anti-glare. They are great for DIY lighting projects and interior lighting design in your space.

How To Add Lighting In Your Tile Niche?

Bathroom niche lighting can add functionality and aesthetic appeal to your bathroom space. Niche lighting brings light to areas that can not mount traditional lamps, such as stone walls, stone lanterns, or bathroom niches. Some customers send us emails to ask how to add lighting to the niche in their bathroom. Today, let’s check how to do it.

Bathroom Niche Lighting

To add lighting to your bathroom niche, we need to consider the factors of waterproofing and tiling. This means you need the lighting to be waterproof. The walls are mounted tiles or marble, so we can not drill holes. So we recommend using our tile aluminum channels, which you can recess into the tiles easily. About the light source, you can add high-density dotless COB strip lights as the light source. The LED channels can hold the strip lights properly and protect them from moisture, dust, and damage. It can also be used as a heat sinker for better heat dissipation of LED lights.

What do you need?

  1. Tile Aluminum LED Channels
  2. Waterproof COB LED Strips
  3. LED Power Supply
  4. Light Dimmer(Not necessary)
  5. Wires
  6. Silicone Glue
  7. Screwdriver

Determine the purpose: Before you install the lighting, decide if it is for accent purposes, task lighting, or both.

Choose the type of lighting: LED strip, puck, or recessed lights are popular choices. We will recommend strip lights, because of their energy efficiency and low heat output. Please ensure the width of the strip lights that the aluminum LED channels can hold. If the width of the PCB board is 8mm and the waterproof version is 10mm. So you must ensure the light channel can hold 10mm strip lights.

Select the colors: there are many colors of strip lights available: single color, dual white, RGB, RGBW, RGBWW, RGBIC, RGBWIC, RGBCCTIC, etc.

How do you install them in your bathroom?

  1. Painting cement mortar.
  2. Insert the end caps, then put the profile.
  3. Stick the tile.
  4. Mount the waterproof LED Strips and press in the diffuser, then lead out the power cable.
  5. Seal the wire holes on the end cap with silicone glue.
  6. Run the cable to the power source and connect the power.

Following the steps above, you could add lighting to the niche for your bathroom, which will give you a stylish and practical tile niche with added lighting that enhances the space. You also can add light dimmer or LED controller to control the strip light to adjust brightness or control color for various scenes.

Bendable LED Tape Channel

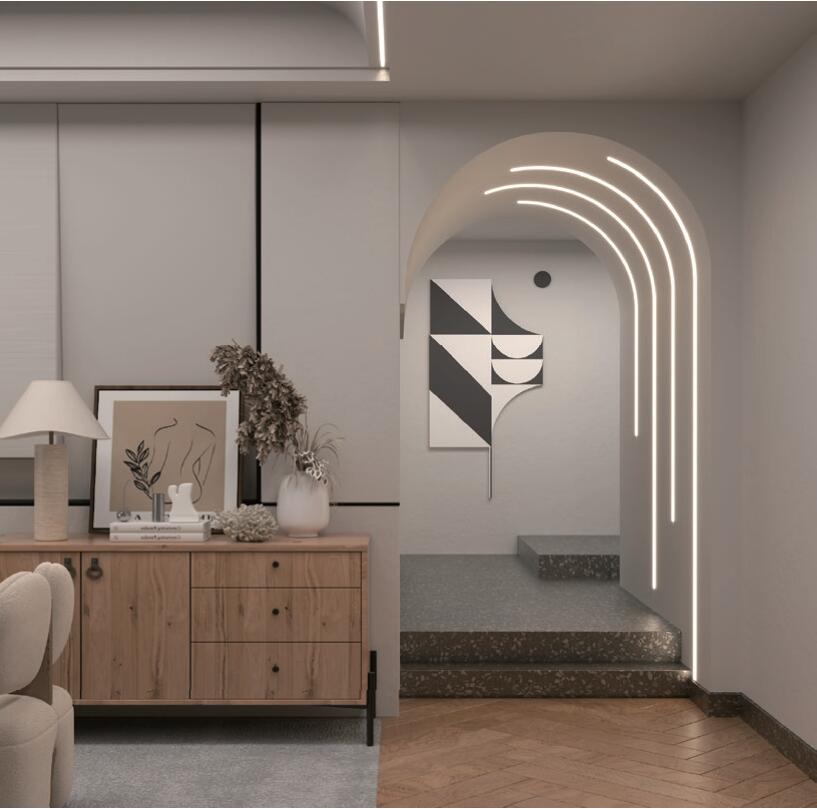
Flexible Lighting Solutions: Exploring Bendable Aluminum LED Channels

Lighting plays an important role in setting the ambiance and highlighting architectural features of interior design. For some places where we can not mount traditional light fixtures or lamps, we recommend bendable LED channels, especially in curved or irregular areas, which is an exciting advancement that offers both flexibility and functionality. Today let’s explore the Bendable LED Channels.

What are bendable Light Channels?

The bendable aluminum light channels are specially designed housings for LED Strips that can be easily shaped to fit curved surfaces and unconventional angles. Unlike the traditional Aluminum Profiles, they can be bent and molded to follow the contours of any architectural feature, providing a seamless and integrated lighting solution. Constructed from durable aluminum, they also offer excellent heat dissipation, ensuring the longevity and efficiency of the LEDs. Three bendable products are available: left-right bending, up-down bending, and full bending. The stock lengths are 1M, 2M, 3M, and can be cut to any size to suit for your needs. Only one type of diffuser is available: semi-clear, made of high-quality silicone material, which will help diffuse the light evenly. There are various width products available, you can install the Flexible LED Strips on side, on bottom for various applications.

Key benefits:

  1. Versatility In Design

The most significant advantage of the bendable aluminum LED channels is their flexibility. Whether you want to illuminate a spiral staircase, highlight a curved wall, or add accent lighting to an arched ceiling, these Channels can be shaped to fit any design requirement. This flexibility opens up a world of creative possibilities, allowing designers to experiment with light in new and exciting ways.

2. Seamless Integration

The traditional lighting fixtures can often disrupt the visual flow of a space. Bendable LED Profiles, however, allow for seamless integration into the architecture. They can be embedded into walls, ceilings, or floors, creating a clean and uninterrupted line of light that enhances the overall aesthetic without drawing attention to the fixture itself.

3. Enhanced Durability

Constructed from high-quality aluminum, these channels are flexible and durable. They provide robust support for the LED strips, protecting them from damage and ensuring they remain securely in place. The aluminum also acts as a heat sink, dissipating heat away from the LEDs and prolonging their lifespan.

Applications:

The applications for bendable LED extrusions are virtually limitless. Here are a few examples of how they can be used:

  • Architectural Lighting: Highlighting the unique features of a building, such as curved facades or intricate moldings.
  • Accent Lighting: Creating dramatic effects in residential or commercial spaces by illuminating coves, niches, or shelves.
  • Retail Displays: Enhancing product displays with customized lighting that draws attention to specific items or sections.

Installation Tips

While flexible led strip channels offer incredible flexibility, proper installation is key to achieving the desired effect. Here are a few tips:

  1. Plan Your Design: Before installation, sketch out your design and measure the area to determine the length of channels and LED strips needed.
  2. Prepare the Surface: Ensure the surface where the channels will be installed is clean and smooth for optimal adhesion.
  3. Bend Carefully: Bend the channels slowly and gently to avoid kinks or damage. Use a bending tool if necessary for precise angles.
  4. Secure Firmly: Use appropriate mounting hardware or adhesive to secure the channels in place, ensuring they are level and straight.
  5. Test the Lights: Before finalizing the installation, test the LED strips to make sure they function correctly and provide the desired lighting effect.

Conclusion

Flexible LED channels are a game-changing innovation in the field of lighting design. Their flexibility, durability, and seamless integration capabilities make them an ideal choice for various applications. Whether you’re a professional designer or a DIY enthusiast, these channels offer a versatile solution to bring your lighting ideas to life. Embrace the future of lighting and explore the endless possibilities that those aluminum LED channels offer.

How To Hide LED Strips Under Cabinet In Kitchen

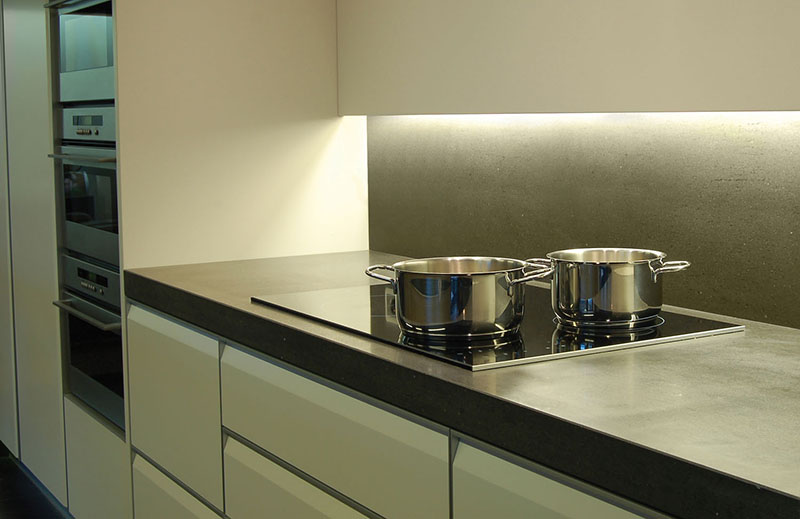
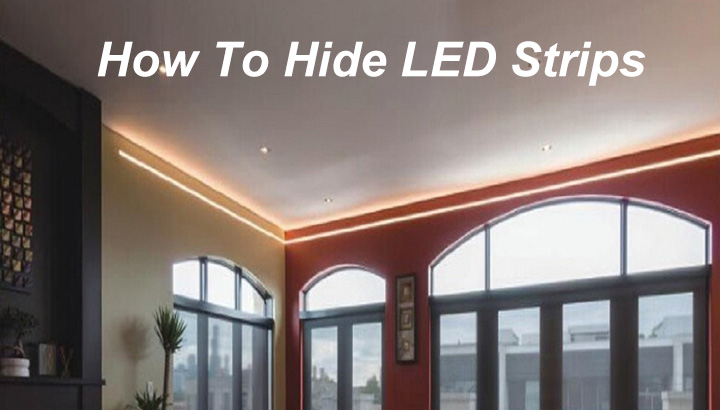
How To Hide LED Strip Under Cabinets?

Adding lighting under the cabinets effectively brightens your cabinets, especially the dark corners or edges. It helps to illuminate the countertop workspace, making it easier to see while preparing food or cooking. We recommend using Flexible LED Strips as the light source, which can provide enough brightness and long linear lighting along the edge of the Cabinets. But the question is, how do you hide the LED Strips under cabinets? Because there is a lot of oil smoke, it isn’t easy to mount them on. Working for a long time in that situation will shorten the lifespan of LED Strips. So we recommend using the aluminum channels to hide the LED strips under cabinets.

LED Light Channel Under Cabinet

What’s the benefit of LED Channels?

The LED Strips will be installed on the aluminum base and the surface with a diffuser, which not only conceals the LED Strips but also protects them from dust, rain, moisture, etc. They can also work as a heat sink for better heat dissipation, extending your LED Lights’ lifespan.

Corner Mounted LED Profiles For Under Cabinets

Where can you get them?

You can order the LED Channels for under cabinets from us below:

https://www.ledbe.com/aluminum-led-channels/cabinet-series-led-profiles

LED Channels For Under Cabinets

Products are available in various shapes, colors, and lengths. You can choose the ones that suit your preference.

How to install them?

  1. Mount LED Strips on the LED Channels and install the end caps.
  2. Mount the mounting clips under the cabinets.
  3. Mount the LED Channels on the clips and lead out the power cable of the Strip Lights.
  4. Connect the cable to a power source or light controller.

What LED Strips do you recommend?

We will recommend the high-density COB LED Strips as the light source; they can create a warm and inviting ambiance in the kitchen and enhance the overall look and feel of the space.

Modern design kitchen

Adding lighting under the cabinet can help to highlight backsplashes or other design features, adding depth and dimension to the room and improving the functionality and appearance of your kitchen.

Toe Kick Lighting-A Great Option In Your Kitchen

Toe Kick Lighting

To enhance the ambiance of your room, consider adding toe kick lighting. This type of lighting is installed at the base of your furniture, such as cabinets or beds, and provides a subtle glow that adds a touch of elegance to your space. With toe kick lighting, you can create a warm and inviting atmosphere, perfect for relaxation or entertaining guests. Whether you prefer a soft, warm light or a vibrant color-changing option, toe kick lighting can transform the look and feel of your room. So why not illuminate your space with this stylish lighting solution?

Toe Kick Board Lighting

What is Toe Kick Lighting?

Toe kick lighting refers to a type of lighting that is installed at the bottom of cabinets or baseboards, typically in kitchens or bathrooms. It is designed to provide subtle and indirect lighting, illuminating the floor or surrounding area without creating harsh shadows or glare. Toe kick lighting is often used for both functional and aesthetic purposes, as it can help improve visibility in the space while also adding a touch of elegance and ambiance. Whether used to highlight a beautiful tile floor or simply provide a soft glow in the evening, toe kick lighting can enhance the overall look and feel of a room.

Kick Toe Light Channels

Where can you add Toe Kick Lights?

To add toe kick lights, you can consider installing them in various areas of your home. One popular option is to place them in the kitchen, specifically under the cabinets or island. This not only provides additional lighting for tasks like food preparation, but also adds a stylish touch to the overall kitchen design.

Another area where toe kick lights can be installed is in the bathroom. Placing them along the base of the vanity or around the bathtub can create a soothing ambiance and enhance the overall aesthetic of the space.

In addition to the kitchen and bathroom, toe kick lights can also be added to other rooms such as the living room or bedroom. Installing them along the base of bookshelves or entertainment units can create a warm and inviting atmosphere.

When it comes to choosing the right toe kick lights, consider options that offer adjustable brightness levels and color temperatures. This will allow you to customize the lighting according to your preference and the specific mood you want to create in each room.

In conclusion, adding toe kick lights can be a great way to enhance the lighting and ambiance of your home. Whether it’s in the kitchen, bathroom, or other areas, these lights can provide both functional and decorative benefits.

Toe Kick Board Light Profiles

How to install the Kick Toe Lighting?

To install kick toe lighting, follow these steps:

  1. Gather the necessary tools and materials:
  • Aluminum Channels
  • COB Strip Lights
  • Screwdriver
  • Electrical tape
  • Wire stripper
  • Wire connectors
  1. Turn off the power:
    Before starting the installation process, make sure to turn off the power supply to the area where you’ll be installing the toe kick lighting. This will ensure your safety during the installation.
  2. Position the Light Channels:
    Decide where you want to install the Aluminum Light Channels. It is usually installed at the bottom of cabinets or furniture to provide indirect lighting. Measure the length of the area where you’ll be installing the Strip lighting and cut the lighting strip accordingly.
  3. Connect the wiring:
    Strip the ends of the wiring that came with the lighting kit. Connect the positive wire to the positive terminal and the negative wire to the negative terminal. Secure the connections with wire connectors and wrap them with electrical tape for safety.
  4. Mount the Aluminum Channels:
    Use a screwdriver to mount the Lighting Channels in the desired location. Make sure it is securely attached and aligned properly.
  5. Test the lighting:
    Once the installation is complete, turn on the power supply and test the kick toe lighting. Ensure that it is functioning properly and providing the desired lighting effect.
  6. Secure the wiring:
    Use wire clips or adhesive cable clips to secure the wiring along the installation area. This will prevent any loose wiring and ensure a neat and professional-looking installation.
  7. Enjoy your Toe Kick lighting:
    With the installation complete, you can now enjoy the added ambiance and functionality the lighting provides.

Remember always to prioritize safety when working with electrical components. If you are unsure about any step of the installation process, consult a professional electrician.

We will recommend two types of Aluminum Channels for Toe Kick Lighting: SK1580TR and SK1580. Both of them have 3 lighting space products available. The SK1580TR allows recessed installation under the cabinets. The SK1580 allows surface-mounted installation. They will create a warm and inviting atmosphere in your room.

Kitchen Toe Kick Light Channel Recessed
Surface Mounted Toe Kick Channels
Bendable Silicone LED Profiles

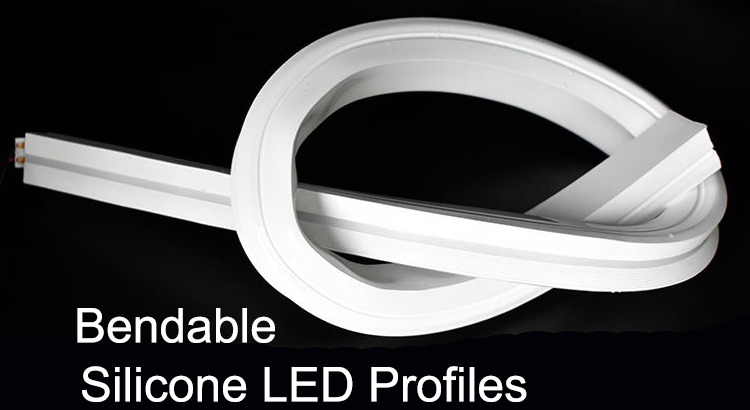
Where You Can Use The Silicone LED Profiles?

The Silicone LED Profiles, which made of 100% food-grade silicone material, flexible and bendable, waterproof and dustproof, many customers maybe not sure where can use them, today let’s check it.

Flexible LED Extrusion

The Silicone LED Profiles, which made of food-grade silicone material, tasteless and non-toxic, flexible and bendable, anti-yellowing and anti-oxidation, low and high-temperature resistance, you can use to design and build the linear LED light or modeling lighting project freely, always 5meters per reel and cuttable, you can cut to any size for your project freely, the end caps with wire holes included, easy to connect to the LED Power Supply to light up the LED Strips or connect to a LED Controller to change the color-changing style or adjust the brightness. some LED Profiles come with metal LED Clips and some come with Silicone LED Clips, you can use the Clips to fix the Bendable LED Profiles on the surface or recess into the lighting project.

Flexible LED Strip Channel

How To Install The LED Strips?

so if the Flexible LED Profiles are 5 meters per piece, how can we install the LED Strips? don’t worry, before we produced them, we noticed it and bring you the perfect solution. there is a rope in the LED Profiles, you can tie a string around the side of the LED Strips and cross the total LED Profile to finish the installation of LED Strips, it’s easy for everyone. the end caps with wire holes, so you can let the wires on the LED Strips through the hole to connect to LED Power Supply or LED Controller. the LED Clips with screw holes, you can use the screws to fix them on the surface on the project.

Bendable LED Profiles

Where You Can Use Them?

the IP rating(waterproof level) of the Waterproof LED Profile is IP67, what the IP67 mean?

” IP67 equipment is the most commonly found in the connectivity market.  It is 100% protected against solid objects like dust and sand, and it has been tested to work for at least 30 minutes while under 15cm to 1m of water.  ”

because of the waterproof and dustproof and poor heat dissipation features, if the working temperature always very high but not good heat dissipation, it will speed up the oxidation of the LED Strips, which means the body of the LED Strips will become to yellow and the light will darker, will shorter the lifespan of the LED Lights. we will strongly recommend using the Silicone LED Channels in a wet, damp or water location, because in there the temperature always lower than in other places. you can use them under the cabinet, in front of a fountain, bathroom or in a swimming pool, etc. be careful to the end caps with wire holes, please ensure use the glue to make it will good sealed.

Bendable Silicone LED Extrusion

Flexible Silicone LED Profile

Side Review Silicone LED Profile

How it looks, not bad, right?