LED Sheet

Everything You Need to Know About LED Sheet Lights

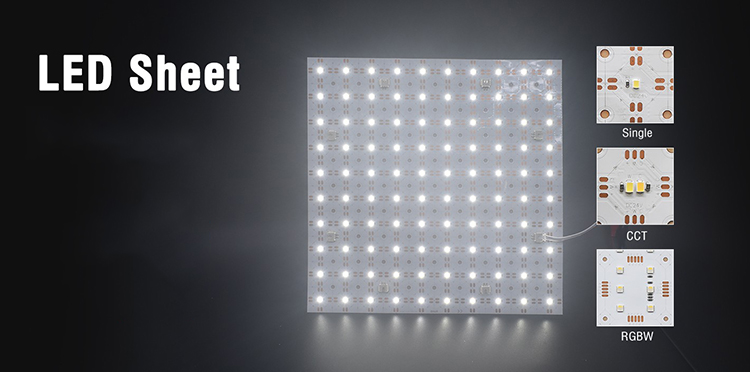
When you try to search LED strips on the internet, you will see the ADs of sheet lights, which are similar to LED tapes but not the same.They are new products that not all people know. But they are hot sales and are welcomed by more and more users. So today, let me tell you everything about the sheet lights.

LED Sheet Lights
  1. What are Sheet Lights?

Like its name, the sheet lights have an ultra-thin structure and sheet shape. The SMD LEDs are arranged on the dual-layer PCB boards evenly to make them flexible and bendable. Multiple connectors are soldered on for easy power or connection to each other. There are cutting lines on the board to make them cuttable, and you can cut to your desired size following the cutting lines. Those sheet panels will create a bright and even glow, highly efficient and customizable for applications, especially as backlighting under marble countertops, in advertising boxes or signs, under shopping windows, etc.

LED Sheet Light's Structure

2. The Benifit Of The Sheet Panels:

  1. Flexibility And Customization: Because the LEDs on the flexible dual-layer PCB board, which make them bendable. The light sheets are cuttable and linkable, which allows them are easy customize for various projects.
  2. Lightweight & Slim: The thickness is only 8mm, which makes them lightweight and slim like paper. They can be installed in limited spaces.
  3. Uniform Illumination: The high-quality LEDs on the PCB board are evenly to create uniform and shadow-free lighting, making them perfect for high-end applications, especially backlighting.
  4. Conveniently Linkable: The LED sheets have extra power adapters, allowing them to connect easily for large projects, cut to the desired size, or bent to the DIY shape.
  5. Longer Lifespan And Energy Efficiency: The LEDs are packaged with pure gold wires and large-size chips to make them have longer lifespan and higher energy efficiency. The double-layer PCB to ensure stable electrical performance.
Bendable LED Sheets

3. What color products are available?

There are many color products available on the market, you can take the single color, dual white, RGB, RGBW, RGB+CCT, individually addressable, and addressable.

Light Sheet Colors

4. Where we can use them?

There are IP20 non-waterproof and IP54 surface coated waterproof products available. You can use them in lightboxes, signages, retail displays, backlighting in signs, marble countertops, etc. You can use the IP54 waterproof products in the wet environments like shopping windows, etc.

Architectural Lighting: They can be installed in ceilings, walls, and floors, you can add diffused cover above the sheet lighting to get a dotless and uniform illumination.

Retail Displays: Good option for backlighting in signages, advertisements, and showcases.

Interior Design: Enhances aesthetic appeal in homes, offices, etc.

5. What Sizes Are Available?
There are two standard sizes available: Rectangle(490*245mm/19.29″*9.65″) and Square(250mm*250mm/9.84″*9.84″). There are extra signal and power adapters on them, so you can connect them together for large projects or cut to small pieces and power on.

Flexible Sheet Panel Dimensions
Free Cut Sheet Light Panels

6. How You Install Them To Power Supply And Controller?

There are multiple power adapters and signal adapters(For addressable products), which allow you to connect them to power supply to power on or connect to controller to adjust the brightness and color temperature, or set the static colors or dynamic modes. You also can solder wires on the copper points and connect to LED driver or controller if you cut them to a very small piece. The accessory bag includes connection wires for easy installation.

The LED Sheet Panel Connection Diagram

7. How can we install them?

There are two methods to install them. The Sheet Panels have double-sided adhesive tape on the back side and they have screw holes on. After clean the surface of the place you want to install, you can remove the protector paper and stick on. Or you can use screws to mount them. The screws and screw shims are included in the accessory bag.

8. Conclusion:

Those sheet lights will be a new great option for lighting, especially backlighting. No matter large lighting projects or small DIY ones. Flexible, bendable, cuttable, and linkable features allow them to be installed and arranged conveniently and quickly. No matter large or small projects, you can choose them. Now you can order them on our website and use the code “sheet-lights” to get 10% off.

Adding voltage for LED Strip Lights

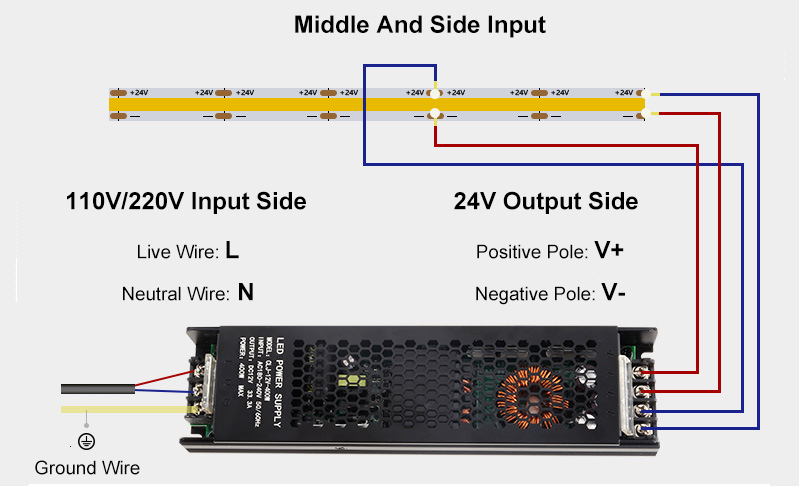
How To Fix The Voltage Drop Issue For LED Strips?

When you connect multiple 5-meter light strips in series, you will find that the LEDs closer to the power source are brighter than those farther away. This is a voltage drop issue that causes inconsistent brightness. Today, we will check how to solve this issue.

LED Strips Voltage Drop

What Is Voltage Drop?

When the light strip is connected in series for more than 10 meters, the voltage will decrease when the current passes through many electronic components: LEDs and resistors. For example, if the normal working voltage is 24V, the measured voltage may be only 20V at 15 meters. If the working voltage of the LED is lower than the standard working voltage, it will appear darker to the naked eye compared to the LED closer to the voltage. This is called voltage drop.

How To Solve?

There are three solutions to solve the voltage drop issue.

  1. Connect the LED Strips in parallel.

If you are installing multiple light strips for your project and need them to be uniformly bright, we would recommend connecting them in parallel to a power supply or controller so that all LEDs have the same operating voltage.

Connect LED Strip In Parallel

2. Choose the high-voltage LED Strips

Because the high-voltage light strips have a parallel design of the lamp beads on the circuit, the voltage drop is very unobvious even in long-distance projects, so they are very suitable for outdoor long-distance projects. The maximum lengths can be 50 meters or 100 meters per roll, and they can be connected in series.

3. Add voltage From the Middle Or Other End

The third solution to fix the voltage drop issue is to add the same voltage from the middle or the other end if the length of the parallel light strip exceeds 10 meters or 15 meters. It is suitable for indoor and outdoor voltage light strip projects. Below is a picture of the wiring diagram for all kinds of connections.

How-To-Fix-Voltage-Drop-Issue

Conclusion

For most users, the method of adding voltage is easiest. No matter how long the light strips are, if you find that the brightness of the LEDs is inconsistent, especially for the high-density COB or SMD LED strips, you can solve this problem by adding the voltage from the middle or the end as shown in our picture.

Bendable LED Tape Channel

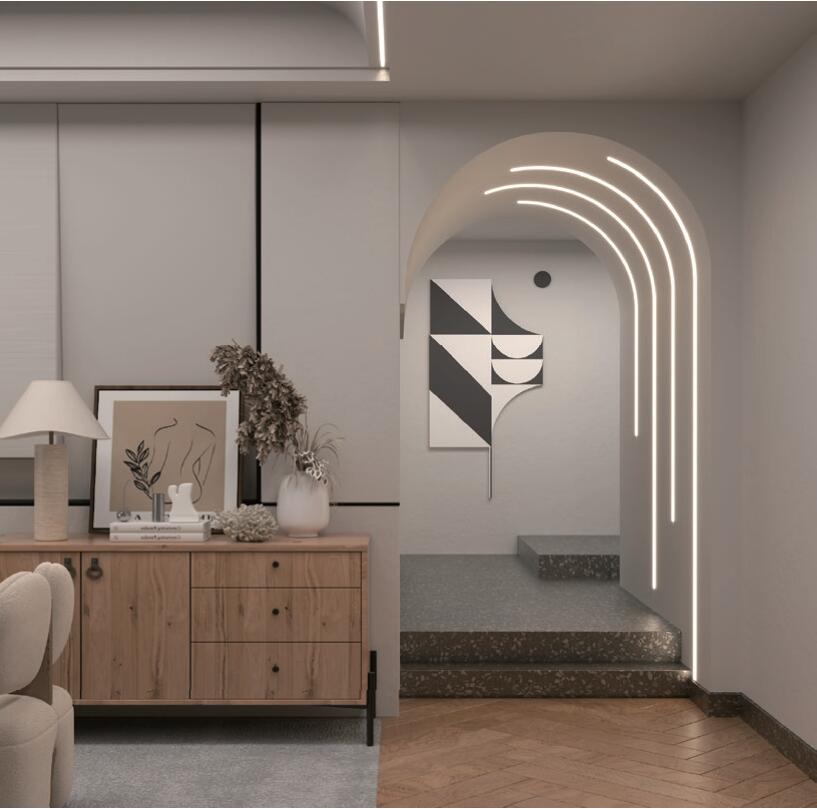
Flexible Lighting Solutions: Exploring Bendable Aluminum LED Channels

Lighting plays an important role in setting the ambiance and highlighting architectural features of interior design. For some places where we can not mount traditional light fixtures or lamps, we recommend bendable LED channels, especially in curved or irregular areas, which is an exciting advancement that offers both flexibility and functionality. Today let’s explore the Bendable LED Channels.

What are bendable Light Channels?

The bendable aluminum light channels are specially designed housings for LED Strips that can be easily shaped to fit curved surfaces and unconventional angles. Unlike the traditional Aluminum Profiles, they can be bent and molded to follow the contours of any architectural feature, providing a seamless and integrated lighting solution. Constructed from durable aluminum, they also offer excellent heat dissipation, ensuring the longevity and efficiency of the LEDs. Three bendable products are available: left-right bending, up-down bending, and full bending. The stock lengths are 1M, 2M, 3M, and can be cut to any size to suit for your needs. Only one type of diffuser is available: semi-clear, made of high-quality silicone material, which will help diffuse the light evenly. There are various width products available, you can install the Flexible LED Strips on side, on bottom for various applications.

Key benefits:

  1. Versatility In Design

The most significant advantage of the bendable aluminum LED channels is their flexibility. Whether you want to illuminate a spiral staircase, highlight a curved wall, or add accent lighting to an arched ceiling, these Channels can be shaped to fit any design requirement. This flexibility opens up a world of creative possibilities, allowing designers to experiment with light in new and exciting ways.

2. Seamless Integration

The traditional lighting fixtures can often disrupt the visual flow of a space. Bendable LED Profiles, however, allow for seamless integration into the architecture. They can be embedded into walls, ceilings, or floors, creating a clean and uninterrupted line of light that enhances the overall aesthetic without drawing attention to the fixture itself.

3. Enhanced Durability

Constructed from high-quality aluminum, these channels are flexible and durable. They provide robust support for the LED strips, protecting them from damage and ensuring they remain securely in place. The aluminum also acts as a heat sink, dissipating heat away from the LEDs and prolonging their lifespan.

Applications:

The applications for bendable LED extrusions are virtually limitless. Here are a few examples of how they can be used:

  • Architectural Lighting: Highlighting the unique features of a building, such as curved facades or intricate moldings.
  • Accent Lighting: Creating dramatic effects in residential or commercial spaces by illuminating coves, niches, or shelves.
  • Retail Displays: Enhancing product displays with customized lighting that draws attention to specific items or sections.

Installation Tips

While flexible led strip channels offer incredible flexibility, proper installation is key to achieving the desired effect. Here are a few tips:

  1. Plan Your Design: Before installation, sketch out your design and measure the area to determine the length of channels and LED strips needed.
  2. Prepare the Surface: Ensure the surface where the channels will be installed is clean and smooth for optimal adhesion.
  3. Bend Carefully: Bend the channels slowly and gently to avoid kinks or damage. Use a bending tool if necessary for precise angles.
  4. Secure Firmly: Use appropriate mounting hardware or adhesive to secure the channels in place, ensuring they are level and straight.
  5. Test the Lights: Before finalizing the installation, test the LED strips to make sure they function correctly and provide the desired lighting effect.

Conclusion

Flexible LED channels are a game-changing innovation in the field of lighting design. Their flexibility, durability, and seamless integration capabilities make them an ideal choice for various applications. Whether you’re a professional designer or a DIY enthusiast, these channels offer a versatile solution to bring your lighting ideas to life. Embrace the future of lighting and explore the endless possibilities that those aluminum LED channels offer.

How To Hide LED Strips Under Cabinet In Kitchen

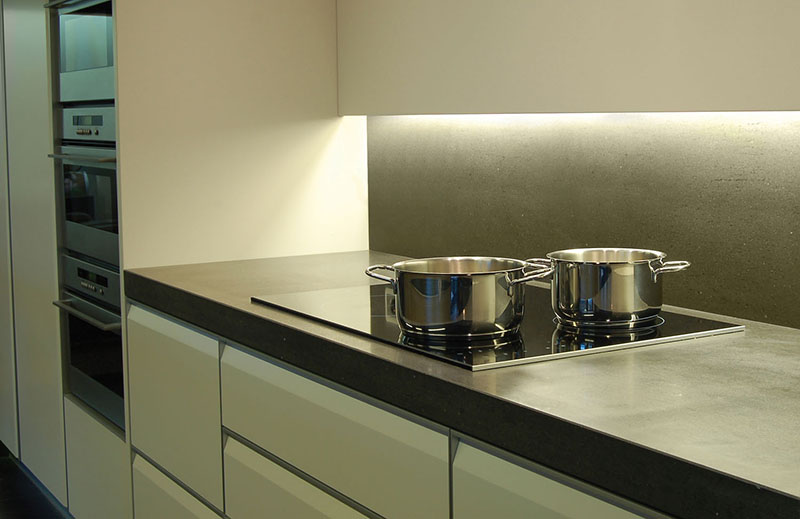
How To Hide LED Strip Under Cabinets?

Adding lighting under the cabinets effectively brightens your cabinets, especially the dark corners or edges. It helps to illuminate the countertop workspace, making it easier to see while preparing food or cooking. We recommend using Flexible LED Strips as the light source, which can provide enough brightness and long linear lighting along the edge of the Cabinets. But the question is, how do you hide the LED Strips under cabinets? Because there is a lot of oil smoke, it isn’t easy to mount them on. Working for a long time in that situation will shorten the lifespan of LED Strips. So we recommend using the aluminum channels to hide the LED strips under cabinets.

LED Light Channel Under Cabinet

What’s the benefit of LED Channels?

The LED Strips will be installed on the aluminum base and the surface with a diffuser, which not only conceals the LED Strips but also protects them from dust, rain, moisture, etc. They can also work as a heat sink for better heat dissipation, extending your LED Lights’ lifespan.

Corner Mounted LED Profiles For Under Cabinets

Where can you get them?

You can order the LED Channels for under cabinets from us below:

https://www.ledbe.com/aluminum-led-channels/cabinet-series-led-profiles

LED Channels For Under Cabinets

Products are available in various shapes, colors, and lengths. You can choose the ones that suit your preference.

How to install them?

  1. Mount LED Strips on the LED Channels and install the end caps.
  2. Mount the mounting clips under the cabinets.
  3. Mount the LED Channels on the clips and lead out the power cable of the Strip Lights.
  4. Connect the cable to a power source or light controller.

What LED Strips do you recommend?

We will recommend the high-density COB LED Strips as the light source; they can create a warm and inviting ambiance in the kitchen and enhance the overall look and feel of the space.

Modern design kitchen

Adding lighting under the cabinet can help to highlight backsplashes or other design features, adding depth and dimension to the room and improving the functionality and appearance of your kitchen.

Waterproof LED Strip Lights

How To Make Your LED Strips Waterproofing?

Some customers ask us the question: How do we make the LED Strips waterproofing? It’s a good question because there are high-quantity demands for the Waterproof LED Strip Lights. You need waterproofing when you want to add LED Strips in your bathrooms, gardens, yards, and other places. Let’s teach you how to make them waterproof.

Items you need:

The steps of making your LED Strips waterproof:

  1. First, choose the appropriate width of the Silicone Channel and cut the same length with your LED Strips.
  2. Waterproof Outdoor LED Strips
  3. There is a rope in the silicone channel; you can tie it to the wires on one side of the Strip Lights and insert it into the silicone channel.
  4. waterproof led strip lights
  5. outdoor led strip lights
  6. Pull the other side of the rope out of the silicone tube and fully let the LED Strips into the tube.
  7. led strip lights outdoor waterproof
  8. Install the silicone end caps with wire holes and without wire holes on both ends of the Silicone Channels, and seal them with silicone glue.
  9. bathroom led strip
  10. led strip outdoor waterproof
  11. Installation finish.

Now you know how to make your LED Strips waterproof. You can add them to your home or outdoor location where you need waterproof resistance.

Know the difference between White Colors Of LED Strips

Color Temperature Of White LED Strips

White LED strips are a type of lighting product that utilizes white light-emitting diodes (LEDs) to produce illumination. These flexible strips can be easily installed in various settings to create ambient lighting or highlight specific areas.

The LEDs used in white LED strips emit a bright and crisp white light, making them suitable for functional and decorative purposes. They are energy-efficient and have a longer lifespan than traditional lighting options, making them popular for residential and commercial applications.

White LED strips are available in various brightness levels and color temperatures, allowing users to customize the lighting to their desired ambiance. They can be dimmed or controlled using smart home systems, providing convenience and flexibility in lighting according to different needs and preferences.

White COB Strip Lights

These LED strips are versatile and can be used in various settings, such as under cabinets, along staircases, in coves or recessed areas, and even outdoors. They are often used for accent lighting, task lighting, or creating visual effects in spaces.

How to choose the right color Temperature of White LED Strips?

LED Strips Color Temperature

Choosing the right color of White LED Strips can significantly enhance the ambiance and aesthetics of any space. It is important to understand that white LED strips come in different color temperatures, measured in Kelvin (K). The color temperature determines the shade of white emitted by the LED strips. Generally, there are three main color temperature options for white LED strips: warm white, neutral white, and cool white.

Warm white LED strips have a color temperature ranging from 2700K to 3000K. They emit a soft, yellowish light that creates a cozy and inviting atmosphere. Warm white LED strips create a relaxing and comfortable ambiance, such as bedrooms, living rooms, or dining areas.

Neutral white LED strips have a color temperature ranging from 3500K to 4000K. They emit a balanced, natural white light that is neither warm nor cool. Neutral white LED strips are versatile and can be used in various settings, including kitchens, offices, and retail spaces.

Cool white LED strips have a color temperature ranging from 5000K to 6500K. They emit a bright, bluish-white light that is crisp and energizing. Cool white LED strips are commonly used in task-oriented areas, such as workspaces, garages, or bathrooms, where clear visibility is essential.

Various Color Temperatures Of COB LED Strips

When choosing the right color of white LED strips, it is crucial to consider the purpose and atmosphere you want to create in the space. Additionally, keep in mind the existing lighting in the area and how the white LED strips will complement or contrast with it.

In conclusion, selecting the appropriate color temperature of white LED strips can significantly impact a space’s overall look and feel. By considering factors such as color temperature and intended use, you can make an informed decision that enhances the ambiance and lighting of your environment.

Where Can You Use Light Diffuser For LED Strips?

Light Diffuser For LED Strips

What are light diffusers for LED strips?

A light diffuser designed for LED strips can be found to enhance the dispersal of light emitted by the LED strip. This accessory helps to create a more uniform and diffused lighting effect. The diffuser can be easily attached to the LED strip and is available in various sizes and materials. It is a helpful addition for applications where a softer and more evenly distributed light is desired.

LED Strip Light Diffusers

Where can you use them?

LED strip diffusers can be used in various applications to enhance the lighting experience. These diffusers are specifically designed to soften and distribute the light emitted by LED strip lights, creating a more uniform and visually appealing illumination.

One common use of LED strip light diffusers is in architectural lighting. They can be installed in coves, alcoves, or other architectural features to provide indirect lighting that highlights the design elements of a space. These diffusers help eliminate hotspots or glare by diffusing the light, resulting in a more comfortable and aesthetically pleasing environment.

LED strip light diffusers are also popular in the retail industry. They can be utilized in display cases, shelves, or signage to accentuate products and draw attention to specific areas. By diffusing the light, these diffusers create a soft and even illumination that enhances the visual appeal of the displayed products.

In addition to architectural and retail applications, LED strip light diffusers are commonly used in residential settings. They can be installed under cabinets, along stairs, or in areas with desired accent or task lighting. The diffusers help create a warm, inviting atmosphere by evenly dispersing the light and reducing harsh shadows.

Furthermore, LED strip light diffusers can be employed in hospitality venues such as hotels, restaurants, and bars. They can be used to create ambient lighting in dining areas, highlight artwork or decorative features, or enhance the ambiance of a space. The diffusers ensure a pleasant and comfortable lighting experience for guests.

Overall, LED strip light diffusers offer versatility and flexibility in lighting design. They can be utilized in various applications, including architectural, retail, residential, and hospitality, to create visually appealing and comfortable lighting environments.

How to install LED Strip Light Diffusers?

To install a LED strip light diffuser, follow these steps:

  1. Measure and cut the diffuser: Start by measuring the length of your LED strip light. Then, cut the diffuser to match the length of your strip. Make sure to leave a little extra space for the connectors at the ends.
  2. Clean the surface: Before attaching the diffuser, clean the surface where you plan to install it. Use a mild cleaning solution and a soft cloth to remove any dirt or dust.
  3. Attach the diffuser: Peel off the backing of the adhesive tape on the diffuser and carefully stick it to the surface. Press firmly to ensure a good bond.
  4. Insert the LED strip: Gently slide the LED strip into the diffuser. Make sure it is aligned properly and fully inserted.
  5. Connect the power supply: If your LED strip light requires a power supply, connect it according to the manufacturer’s instructions. Ensure that the power supply is compatible with the strip and that all connections are secure.
  6. Test the lighting: Turn on the power and check if the LED strip light is functioning correctly. If not, double-check the connections and troubleshoot any issues.
  7. Adjust the diffuser: Once the LED strip light is working, you can adjust the diffuser to achieve the desired lighting effect. Some diffusers allow you to change the angle or intensity of the lighting.
  8. Secure any loose parts: If any parts of the diffuser or LED strip are loose, use adhesive or clips to secure them in place.

Below are the steps for installing the ALP128 Trimless Light Diffusers Of LED Strips:

Trimless Drywall LED Strip Light Diffusers
How To Install The Aluminum Light Diffuser

What is Baseboard Lighting? And How To Add?

Add Baseboard Lighting

What is baseboard?

Baseboard refers to the wooden, tile, or aluminum board between the wall and the floor. It is typically available in varying shapes and colors, with a typical size ranging from 3 to 8 inches.

What’s the purpose of a Baseboard?

The purpose of the baseboard is to serve as a protective barrier and decorative element along the bottom of the walls. It is designed to cover the joint between the wall surface and the floor, preventing damage from furniture, vacuum cleaners, and other objects. Additionally, baseboards can add visual appeal to a room, enhancing its overall aesthetic. Baseboard also helps to hide gaps and unevenness between the wall and floor, creating a finished and polished look. In summary, baseboard serves practical and aesthetic purposes, providing protection and enhancing the appearance of walls and floors.

How do you add LED baseboard lighting?

To add baseboard lighting, follow these steps:

  1. Plan the layout: Decide where to install the baseboard lighting and mark the locations on the wall. Consider the size and shape of the room, as well as the desired lighting effect. And choose the best Aluminum LED Channels for baseboard lights.
  2. Gather the materials: You will need baseboard lighting fixtures, LED light strips, a power supply, connectors, and any necessary tools such as a screwdriver or wire stripper.
  3. Prepare the baseboards: Clean the baseboards to ensure a smooth installation surface. Remove any existing baseboards if necessary.
  4. Install the power supply: Choose a suitable location for the power supply and mount it securely. Make sure it is accessible for future maintenance.
  5. Install the baseboard lighting fixtures: Attach the fixtures to the baseboards using screws or adhesive. Ensure they are evenly spaced and aligned correctly.
  6. Connect the LED light strips: Cut them to the desired length and connect them using the connectors. Follow the manufacturer’s instructions for proper installation.
  7. Wire the lighting system: Connect the LED light strips to the power supply using the provided wiring. Make sure to follow the correct polarity and secure the connections.
  8. Test the lighting: Turn on the power supply and check if the baseboard lighting works properly. Make any necessary adjustments or repairs.
  9. Secure the wiring: Use clips or adhesive to secure the wiring along the baseboards and prevent any tripping hazards.
  10. Finishing touches: Replace any removed baseboards and touch up the paint if necessary. Ensure that all connections are hidden, and the installation looks seamless.

We recommend our SK1270 LED Channels to add baseboard lighting to your room. There are three colors available: silver, white, and black. The standard length in stock is 2 meters per piece, and you can cut to any size you desire. Come with PC Diffused Covers to diffuse the LED Strip Lights to create soft ambient lighting following the footline. Please check the picture below to learn what you need and how to install them.

How To Add Baseboard/Skirting/Footline Lighting

If you want to add baseboard lighting to your room, you could follow the steps above. The Baseboard lights in your room can be a great addition to enhance the ambiance and functionality of the space. Whether you are looking to create a cozy atmosphere or add task lighting for specific areas, baseboard lighting offers a versatile solution.

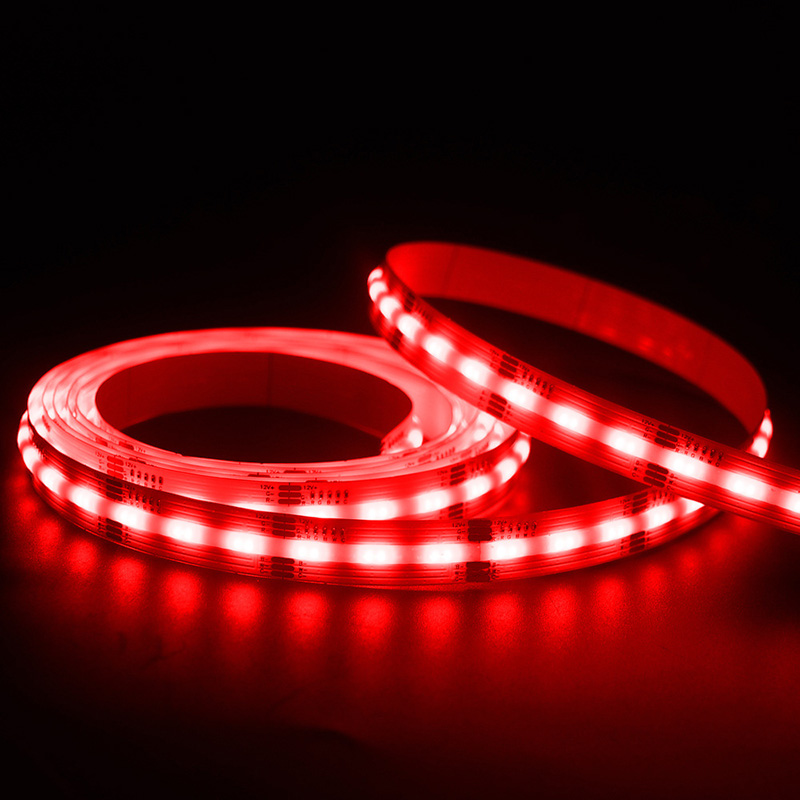
What Is The Difference? RGB VS RGBW VS RGBWW.

When you want to order some colorful strip lights for your home, you search on Amazon and will find that you have many choices: RGB, RGBW, RGBWW. So the question is, what is the difference between them?

What the difference of RGB, RGBW, and RGBWW

The difference between the RGB, RGBW, and RGBWW is the number and type of LEDs used.

RGB stands for red, green, and blue and prefers a type of LED Strip that uses three colors to create shades and hues. These Strips are commonly used for decorative lighting and can produce various colors.

RGBW stands for red, green, blue, and white. In addition to the three primary colors, RGBW LED Strips also include a white LED. This allows for a broader range of color options and the ability to create pure white light. There are two structure products available: RGB+White and RGBW 4-In-1.

RGBWW stands for red, green, blue, warm white, and white. These LED Strips will create a softer yellow-white and allow you to adjust the color temperature for various scenes.

You can use the RGB LED Strips to create colorful ambient lighting. And RGBW for brighter ambient lights. RGBWW allows the brightness adjustment and the change of the color temperature from warm white to cool white.

RGB, RGBW, RGBWW LED Strips

How to cut the RGB, RGBW, and RGBWW LED Strips?

The RGB LED Strips have 4 Pins on the PCB board, RGBW has 5 Pins, and RGBWW has 6 Pins. You can cut to the size you want from the copper cutting point.

RGB CCT COB LED-Strips

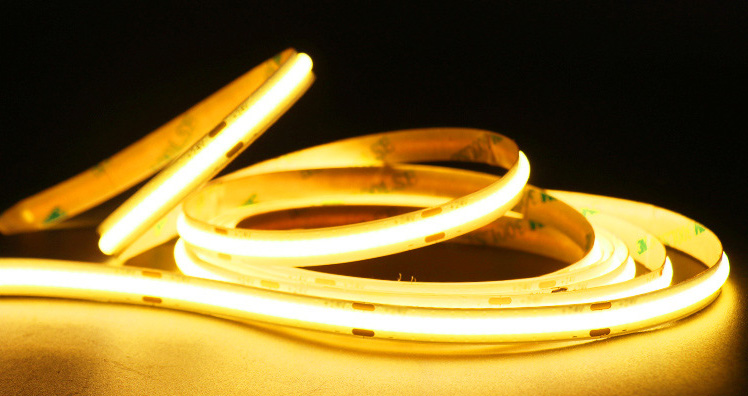
Why The COB LED Strips Are More Popular Than SMD’s?

If you want to add some LED Lights that are flexible, bendable and cuttable, we will recommend using the LED Strip Lights, but now more and more users will choose the COB LED Strips, not the SMD LED Tapes. today let’s check the advantage of COB LED Lights.

RGB COB LED Tapes

“COB” is the abbr chip-on-board technology, the newest technology of packaging the LED Chips, 320PCS/480PCS/520PCS or 840PCS LED Chips are mounted on every meter flexible PCB board to allow high density LED array. to create a totally smooth, seamless line of light, this outstanding design will not show any visible light dots or hot spots, making it ideal illumination for reflective surfaces, such as countertops, tile floors, jewelry cases and backlighting.

Advantages:

  • More Bright
  • No Visible Light Dots And Hot Spots
  • 90+ High CRI

Due to the high-density LED Chips packaging technology, the COB LED Strips are more bright than the SMD’s, the max LEDs that can be mounted on every meter PCB board is 144PCS, but for COB, the number increased to 840PCS. the more Light Chips mean the COB LED Lights are more bright, you will not see any visible light dots and hot spots. from the photo below, you will see the difference:

COB LED Strips Advantage

the COB LED Tapes with a higher CRI(color rendering index) value, the value of single color is 90+ and multiple colors is 80+, with the higher CRI, the reflection of lighting on the products look more natural, which makes the subject outstanding in color and features of materials, perfectly reflecting the colors of subject and the human beings. it’s an ideal lighting solution for stores that sell fruits or foods.

Color Rending Index

the COB LED Strips are flexible, bendable and cuttable too, the width from 2.7mm to 12mm for various applications, you can take single colors like warm white, white, natural white, red, blue, yellow, purple, etc, the multiple colors are available: RGB, RGBW, RGB+CCT, Dream color. you can choose the different waterproof level products for your projects from IP20, IP65, IP68 and IP68.

Now the price of COB LED Lights is very close to the SMD’s, so if you want to get a better result for your lighting projects, we will strongly recommend the COB LED Lights.